Ah, mudrooms. Whether you call it a mudroom, entryway, or, “that space where we come into our home that’s always piled with mounds of shoes, bags, backpacks, toys, homework assignments,” it’s an area that can be a source of frustration because of its seemingly never-ending chaos. You can, however, regain control — and make this a functional and tidy area that you don’t rush past to avoid because you’re so sick of looking at the mess but are too overwhelmed to do anything about it.
If you’ve read any of our previous articles (and we certainly hope you have!) you may notice that we’re huge fans of staging areas when it comes to any sort of project in your house or apartment. It may be tempting to just throw yourself into the task at hand without thinking too much about it because you might just go talk yourself out of it, and catch up on Netflix instead, but we guarantee that the time you take to prep will save you time in the end.
(Though by no means do we mean to quash that “let’s go and get ’em” spirit! But we want to channel it properly so that the process is productive and satisfying once you’re finished.)
So, a staging area — what does it mean? You need a place where you can dump everything that you’re going to take out of that entryway so that you are working with as clean a slate as possible. Doing so will also allow you to see possibilities you may not have before because too many things are in the way. You may discover little nooks and crannies that are perfect for a certain little organization solution that’ll feel genius — such as the perfect spot to hang a bracket where you’ll mount a flashlight in case there’s a power outage so that you’re not frantically hunting through random drawers in the dark.
Your staging area might be in an adjacent hallway or room; it might be stairs if that’s what your mudroom connects to. And it might even be one corner of the entryway itself if you’re living in an apartment or smaller quarters. Read through this article first and decide which of these items to implement. You may need to then gather or buy supplies. Do that first so that you have everything ready at your fingertips. And then, you’re going to start by filling up that staging area. Anything you can get out of the space you’re organizing put in the staging area. Try to organize like with like, so that when you’re setting everything up, you’ll have all your purses, for example, in one location.
The next thing you’re going to assess is what you are working with. Take a look at our various ideas below, and mix and match to find the perfect combination of solutions for your particular situation.
Closet

If you have a closet in your entryway, maximize it to its fullest potential. Install a closet doubler (we explain what that is in detail in this post). Hang long coats on the portion of the upper rod that is clear of the closet doubler, and hang shorter coats directly above and below/from the doubler.
You can also partition this closet by purchasing hanging shelves that you can hang from the top closet rod. This will depend on what you use this closet for — if it’s mainly or all coats and clothing, having rods across the entire horizontal space makes sense. But if your closet also holds items that do better on shelves, that hanging shelf solution is a good one for you. You can use it for purses, bags, hats, scarves, gloves. And dedicate a portion of this hanging shelf unit as a “catch-all” — meaning, that’s a spot where you can empty your pockets or purse if you need to.
This is also a great spot for storing things that you need to bring somewhere else: Tupperware that you brought home leftovers in from a friend’s house; gifts you’ll be presenting to others; items that need to be returned. Having a dedicated spot for these means that’s the only place you’ll need to check before you’re headed out.
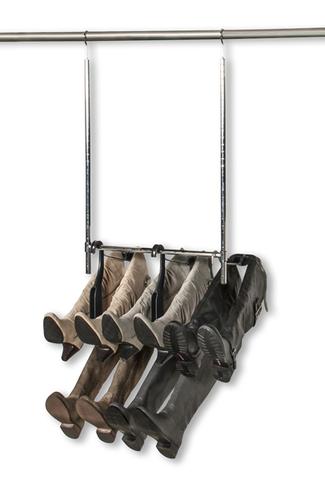
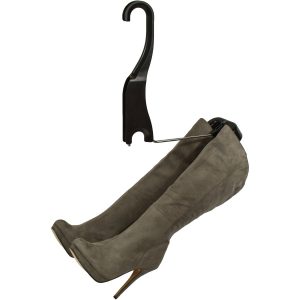
This closet can also be a perfect location for your Boot Butler! Since we’ve designed it to be stackable the way you need it to be, you can either hang it all vertically from the top closet rod or, have a more horizontal version that you’ll hang from the closet doubler. This way, you can kick off your boots when you walk through the door and hang them up nice and neat where they’ll be waiting for you the next time you’re ready to wear them.
Door Storage
If the aforementioned closet has a door, you can dedicate the inside, outside, or both to storage solutions. Install hooks for purses and backpacks. Make sure they are sturdy and extend out far enough so that the items you hang won’t slip off, but not too far so that they get in the way. You can also install a smaller row of hooks to hang smaller items, such as scarves or hats or gloves/mittens for the colder months.
Alcove
If you’re working with a cubby instead of a closet, you can also try the closet doubler. If the cubby extends pretty far back (this same notion goes for the closet, by the way), use the parts that are all the way at the back for seasonal storage. Meaning, don’t put anything in there that you will need a daily basis. So, that’s a great spot once you’ve done your seasonal clothing switch, a great spot for various holiday decorations or sporting equipment you only use at a certain time of the year.
Bags
Whether you’re hanging things on a closet rod or hooks, have some plastic bags where you can put small items like gloves. Clear bags are best as you’ll be able to see at a glance what’s inside.
Boot Tray
If you live in a climate or area where your boots get pretty soaked, put a boot tray right by the front door. Make sure it has raised sides so that water doesn’t seep out onto your floors and carpets. Set the boots there so they can dry off; you can also include a small basket with cleaning supplies like some cotton rags, a boot brush, and the like. Once the boots are dry and clean, get them up onto your Boot Butler. (Check out this blog post for an in-depth dive into leather care for your boots.)
Message Center
Since the entryway is a place where everyone in the household comes and goes, that’s a great place for a family calendar. Hang it on a portion of a doorway that’s easily visible. Or, hang a corkboard where you can pin flyers, reminders, announcements (the back of a door is a great place for this and/or the next item). You can also have a whiteboard with velcro-ed markers, so you can write notes, have reminders, cheery messages, etc.
For a fun DIY project, paint a section of one of your walls with paint specially formulated to be written on. You can put frames around that section or leave it unframed for a more rustic look. Install a hook or bracket nearby for a little container of chalk.
Wall Space: Hook It Up
If you have a lot of unused wall space, install a series of hooks or brackets with multiple hooks. If you have little ones at home, use round drawer knobs instead of hooks, and install them at a kid-friendly level. You can paint them various colors for different family members so that there’s no confusion about whose stuff goes where.
Mirror, Mirror on the Wall
If you don’t have a mirror in your entryway already, and you have the space for it, consider adding one in. It’ll not only be super helpful when you’re dashing out the door for the last look-over, but it’ll help brighten and expand the space. You can hang a full-length mirror so that you can see yourself head to foot, or install a horizontal version for more of a console look.
Gear Organizer
If your entryway is constantly full of various gear, corral it using storage bins. These come in cloth, metal, plastic — choose the ones that best fit your look and lifestyle. For easy access, choose options with wheels on the bottom. Place a bench against the wall, and then slide the bins under that. Label the bins clearly so that anyone can see what goes where at a quick glance.
Keys
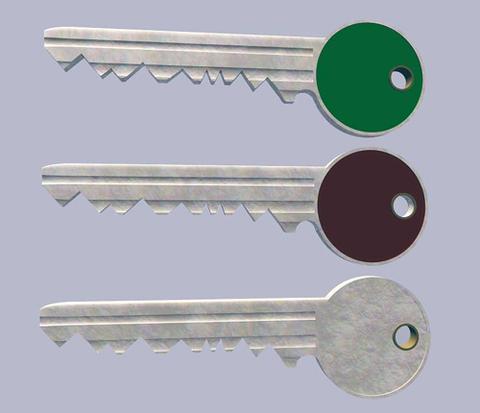
If you have multiple sets of keys and multiple users, dedicate a space in your entryway to a clearly labeled and organized key rack. You can DIY by installing small hooks; paint the hooks different colors for different sets, and then put a dab of that same paint on the base of the keys.
Umbrellas
The Rihanna song is catchy, but having umbrellas underfoot and in random places that suddenly disappear when you need them is less fun. You can either purchase an umbrella stand and place it in a corner or make one yourself by repurposing a tall flower pot.
Shelves
Finally, a word on shelves. Measure the space where you’d like to install these, and either purchase shelves in that dimension, or have your local hardware store cut them to size. Install shelves high up for items you rarely need, or where you place decorative elements like pots with flowers, picture frames, colorful knickknacks and the like.
Mount shelves at a lower level to place items like hats and purses. You can place small baskets on these shelves for items like keys and sunglasses.
You can also install shelves in unexpected places – anywhere they might fit where there’s ample wall space and where they won’t be in the way of an opening/closing door or someone rushing past.
Enjoy
Once all is installed and organized, admire your new space! Won’t it be a lovely relief to come home and have the first space you enter be organized and neat? We know it will. Enjoy!