 Fall and winter can wreak havoc on your leather boots. We very much understand and are here to help. With a bit of time, elbow grease, and the tips below, you can not only get your boots looking substantially better but protect them from the elements.
Let’s do this!
Grab the boots you want to work on, and make yourself a staging area. If you’re working on carpets, spread out a towel or old t-shirt. If you’re working on wooden floors, you can either do the same or keep a small broom and dustpan handy.
You’ll also want to assemble your supplies. Depending on what you’re going to do to the boots, grab some or all of the following:
- clean rags (Old t-shirts are perfect for these types of jobs as well; cut them up into smaller pieces to have a plethora on hand)
- soft brush
- baking soda
- cornstarch
- rubbing alcohol and q-tip or cotton ball
- pencil eraser
- magic eraser
- white vinegar
- olive oil (and no, we’re not about to make a salad with those last two)
- leather cream
- waterproofing spray
CLEAN
 First, we’re going to get those boots nice and clean. The way we’re going to do this will depend on the type of leather your boots are made from. Let’s figure that out first.
It may be as simple as looking inside your boots to see if the material’s printed there. Or, looking at the box or pamphlet that came with your boots.
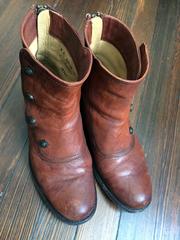
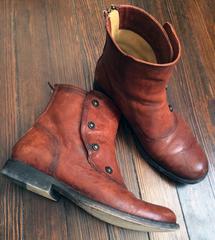
If not, look at the leather: Is it shiny or matte? Hard when you touch it, or soft? Shiny + hard when you touch it = finished leather. Matte + soft to the touch = unfinished leather. Suede, for example, is unfinished leather. The boots we have pictured here are all finished leather.
Finished leather is more impervious to water. So to clean finished leather boots, grab a damp cloth. Not soaking wet, but damp enough so that you can rub away any visible dirt, grime, salt stains, mud.
For unfinished leather, use a dry cloth or soft brush. Rub or brush away anything you see on the leather.

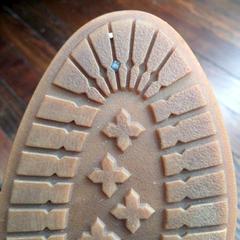 Once you’re done, flip those boots over and examine the soles. Clean them with a rag, and examine the threads: Is there anything stuck in there? We found, for example, a tiny shard of glass in the threads of one of our boots – yikes! No idea how it got there, but not something you want to remain. Use a pen, pencil, tip of a knife, or anything with a point to get out any debris. If your boots are sandy, let the sand dry thoroughly, and then clap them together vigorously till all the sand shakes loose.
Now we’re going to let those boots dry. As tempting as it may be, don’t put them on or near a radiator that’s blasting heat. Direct heat sources are terrible for leather and for your boots’ soles, whether they’re made from rubber or wood. Let the boots dry naturally.
SCUFFS and STAINS
There are a number of tricks for treating scuffs on treated leather.
Mix up a batch of equal parts baking soda and water so that you get a thickish paste. Rub that onto the scuffs with a damp rag. Then wipe away the paste with a clean damp rag.
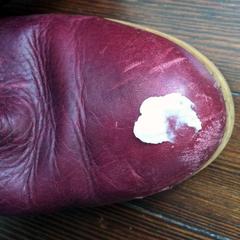 You can also use either a magic eraser or pencil eraser on scuffs; rub the scuffs gently till they disappear. You can also dip a corner of a clean rag into olive oil and rub that into scuffs.
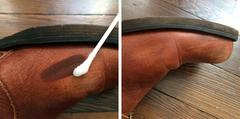
If you’ve got an ink mark or tar on your boots, dab a q-tip into some rubbing alcohol. Gently rub the stain. The rubbing alcohol will remove the stain but will dry out the leather, so you’ll need to take extra care to a condition that part when we get to those next steps.
For unfinished leather, grab a pencil eraser to tackle scuffs. Rub it gently on the scuff with the direction of the suede (not against it).
SALT / OIL STAINS
You can get rid of salt stains the same way for both finished and unfinished leather:
- Mix equal parts white vinegar with water, and dab the stains. For unfinished leather, you’re going to want to do this quickly since this type of leather isn’t crazy about moisture. For finished leather, you can rub more vigorously.
- Once the salt stains are gone, brush your suede to get rid of the vinegar/water combo; use a damp rag on the finished leather to do the same.
 Oil stains on your unfinished leather? Pour small amounts of cornstarch over the stains. Let those sit for a while so that the cornstarch absorbs the oil. The process will take at least a few hours, so you can leave them to sit overnight, and then wipe away the cornstarch with a dry rag.
A last note on cleaning your leather: Due to its nature, all leather has natural variations. And often times, it’s those variations that make your pair of boots unique.
WOODEN HEELS
If your boots have wooden heels, olive oil will condition those nicely. Dab some onto a clean, dry rag, and rub them in. Take note that this will darken the wood a bit. If you’ve got clogs, they’ll likely also have wooden heels, and you can work this olive oil magic here as well.
CONDITIONING

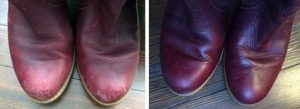 Once your boots are clean; the scuffs are gone or at least minimized; stains have been treated; we come to the fun part.
Get out whatever product you’ve chosen to condition your leather. We’re going to be using a “waterproof dressing” in a neutral color. Read the instructions first.
Ours says: “Apply cream with a clean dry cloth, working well into leather. Wipe and buff to a shine.”
Follow your instructions, which will be something along those lines.
You’ll be able to gauge how much product you need by seeing how quickly, or slowly, it’s absorbed into the leather. If the leather drinks it up quickly and is gone fast, do another coat.
Let that sit for a bit before you buff, which basically means you’re going to rub your boots quickly back and forth with a clean rag till they’re shiny. Voila!
WATERPROOFING
The product we chose has waterproofing already built in, which is nice. But you might want to go a step further, especially if you encounter lots of water and snow. Choose a waterproofing spray specifically made for your type of leather, whether it’s suede or finished leather.
Waterproofing sprays of suede may darken the color a bit so do a test spray in a tiny spot to make sure the ensuing color works for you.
STORAGE
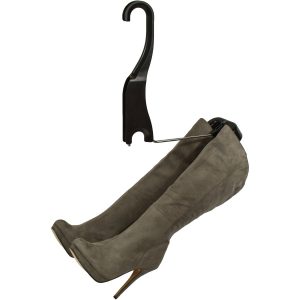
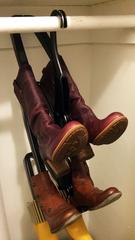 Now that you’ve done all this work and your boots are looking fine, what are you going to do with them? We’re going to hang ours up on our Boot Butler.
Which means that our boots don’t topple over and they don’t crease (don’t you just hate boot creases? We do. They not only look bad but prolonged creasing can cause some serious wear and tear on the leather).
Enjoy those awesome-looking bots!