 Happy 2016! May your new year be healthy and joyful, as well as personally and professionally fulfilling. And if one of your new year’s resolutions is to better organize your footwear, you’ve come to the right place.
The goal is to make the best use of whatever space you have. And whether your closet is small or more generously proportioned, the right organization will make a world of a difference.
1: ASSESS THE SITUATION
Begin by assessing your shoe and boot collection. A staging area — meaning an area where you can place all the items you want to organize — will be helpful. Optimally, this area will be in a location near your closet, so that you can take all your footwear out and have empty space in the closet to work out the best organizational solution.
Look for your shoes and boots. Which are you wearing regularly? Which do you love? That’s your Yes Pile. The second will be the No Pile: Items you haven’t worn for a long time, or simply cannot see yourself ever wearing again. And the third pile will be the Maybe Pile: This one is often the toughest because ultimately you’ll need to put the items into either the first or second pile.
Good questions to ask about Maybe Pile items include:
- If I had to purchase this item right now at full price, would I?
- Can I see myself wearing this item within the next month? Next three months? Where and when and how (with what outfit)?
- Do I love this item? Does it make me feel good when I wear it?
- Does it fit well? And does it fit my current lifestyle?
- Would I choose this item over another item? For example, if I’m looking for a pair of knee-length boots to wear with my favorite leggings, would I choose these, or do I always choose another pair?
Be honest with yourself. But also, be gentle. Letting go of items isn’t always the easiest thing in the world. Remember, though, that at the end of the day your goal is a space that is well-organized and clean: Keep that goal in mind if you’re waffling and having a difficult time making a decision.
Yes Pile bonus tip: Now is the time to get all your shoes and boots into tip-top shape. So before you begin organizing them, take time for general maintenance. Clean any dirty items. Waterproof any shoes and boots that you regularly wear outside. Give your leather items some love by conditioning them with leather cream, and — if you want some extra shine — with a neutral shoe cream that you’ll buff till the leather shines. And if any items need repair, have those done before you put them back into your about-to-be-so-organized closet. Or, gather up all of the pairs that need some love in a box and take them to your local cobbler; s/he can take care of all of the maintenance and cleaning for you.

Boots can make an outfit dazzle and shine. They’re also great ways to help keep warm in the cold months. But they take up substantial space, especially the mid- to knee-high styles. Various options are available here.
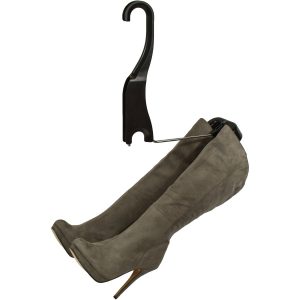
The first is a hanging boot rack. And yes, that means it’s shameless plug time! But we do love our product and are proud of how many closets it’s helped. The Boot Butler will get your boots off the floor, or off the shelf where they lie crammed in with other pairs. Both of those options are bad for the boot material, which can crinkle, crease and scratch. The Boot Butler keeps each pair stored erect, so that the shaft is straight, and also well-ventilated. The modular design lets you adapt the rack to your particular closet: You can hang five pairs of boots vertically below a typical long hang closet rod to take advantage of your vertical space, or hang your boots two high, three high, etc. from a lower rod, to utilize your horizontal space.
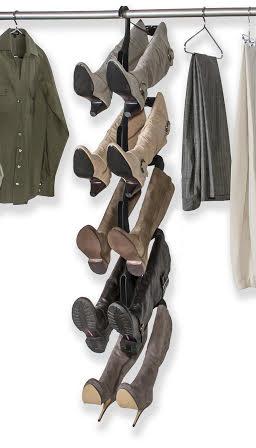
And once you have your boots hanging, they’ll be so much more accessible: You’ll be able to see them all at once and be able to mix and match to a particular outfit. Plus the boots are easy to take off the Boot Butler and then slide right back on once you’re done wearing them.
Another option is custom boot cubbies. These are tall, narrow shelves (dimensions ~10″ wide by 24″ high). They’re a posh way to store your boots, but not space or cost-efficient.
You can also install wall-mounted, inverted boot racks. These are for more utilitarian boots — rain boots, snow boots, work boots — that you can hang in a garage or mudroom. Inverting boots like these will get them dry quicker, which is important if you’re using them during rainy, snowy or muddy times of the year.
3: NOW THE SHOES
With the larger items — boots — all organized, it’s time to tackle that shoe collection.
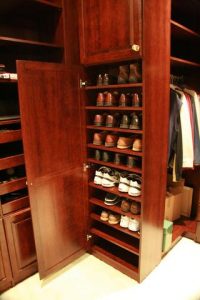
Shoe cubbies, whether made of plastic, wood, or other materials, are not optimal, and here’s why: They’re not adjustable. And rarely in the world of closets does one size fit all. Plus, dirt and grime can collect in the back corners, meaning that shoes may come out dirtier than when they went in.
Instead, go for shoe shelves, but make sure they’re adjustable. You’ll want the shelves far enough apart to comfortably slide shoes in and out, and have as many, or as few, shelves as you have room for. Ideally, you’ll want to group your stilettos together on one or more shelves spaced for that height, then your flats together on another shelf, and so on, so that you are maximizing the use of your vertical space. 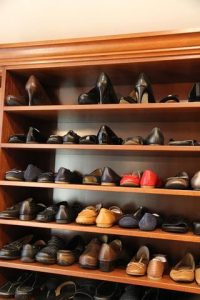 Many shoe shelves are stackable, and come in a variety of materials: From metal to cedar, make sure they are sturdy enough to hold multiple pairs of shoes (you don’t want shelves made from cardboard or flimsy plastic).
Once you have your shelves the way you want them, arrange your shoes. But alternate the way they face: If the first shoe has the toe facing you, place the second shoe so that the toe faces away from you. You’ll be saving space because the narrower heel part sits next to its counterpart’s wider toe. That space can add up to about one inch a pair, and over multiple pairs of shoes, can allow room for an extra pair.
4: MAINTENANCE
Once your footwear is organized, it’ll be much easier to maintain cleanliness and order. Since each pair of shoes and boots now has a proper home, take the time to return whatever you’ve worn to its place.
And if your shoes or boots have gotten dirty during the day, clean them before you put them away:
- For leather shoes and boots, brush away loose dirt with a dry cloth;
- Clean suede with a soft nylon brush;
- Wipe patent leather and synthetic materials with a damp cloth.
If your footwear has gotten muddy or wet:
- Leather can be cleaned with a damp cloth; let the leather dry naturally (away from a direct heat source), and then condition with a leather cream.
- Snow boots made from synthetic materials can be wiped with a damp cloth. If the boots have gotten especially wet, let them dry at room temperature before you put them away, either on an absorbent mat right by your door, or – in a pinch – an old cookie sheet that’ll allow the water to collect without trickling all over your floor and carpet.
- Suede can be trickier to clean if soaked, so try to avoid puddles and snow piles. If your suede has gotten wet, let it dry at room temperature, and then brush the suede with a soft old toothbrush or nylon brush. If the suede has gotten completely soaked through, you can stuff crumpled newspapers or paper into the foot, as the suede may contract once it dries.
If your shoes or boots have wooden soles, wipe away dirt or mud, let them dry at room temperature, and then use olive oil for conditioning and shine.

Whether you’ve done a major footwear overhaul, or simply implemented a few of the above steps: Congrats!
Change is never easy, especially given the busy lives we all lead. You’ve done something positive for your shoes and boots, your closet, and yourself! Enjoy the fruits of your labor, and your beautifully organized shoe and boot collection.